
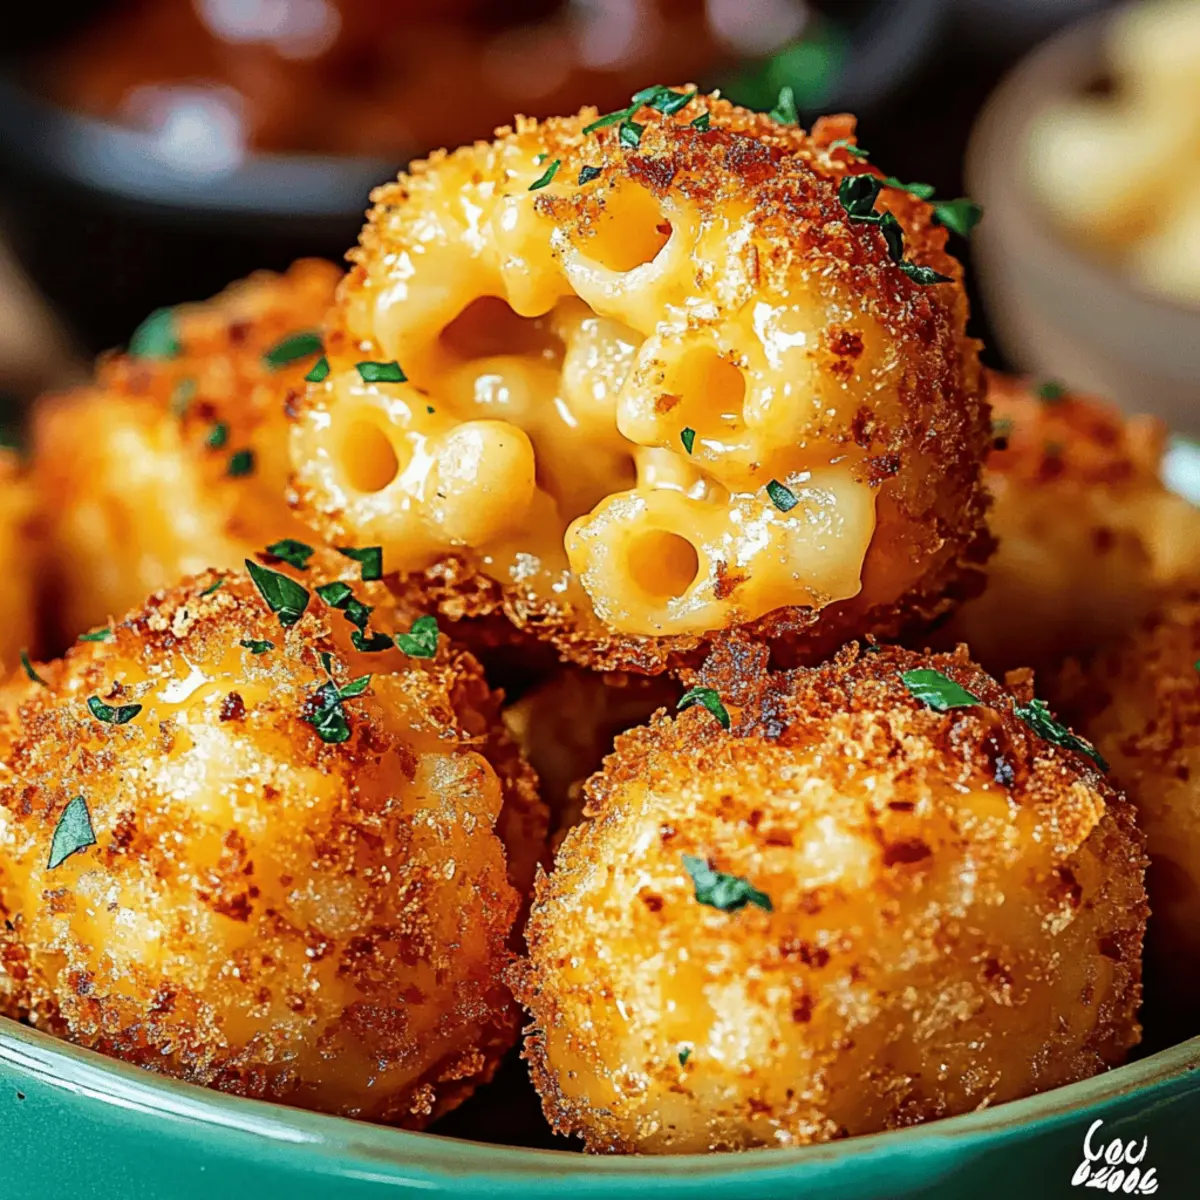
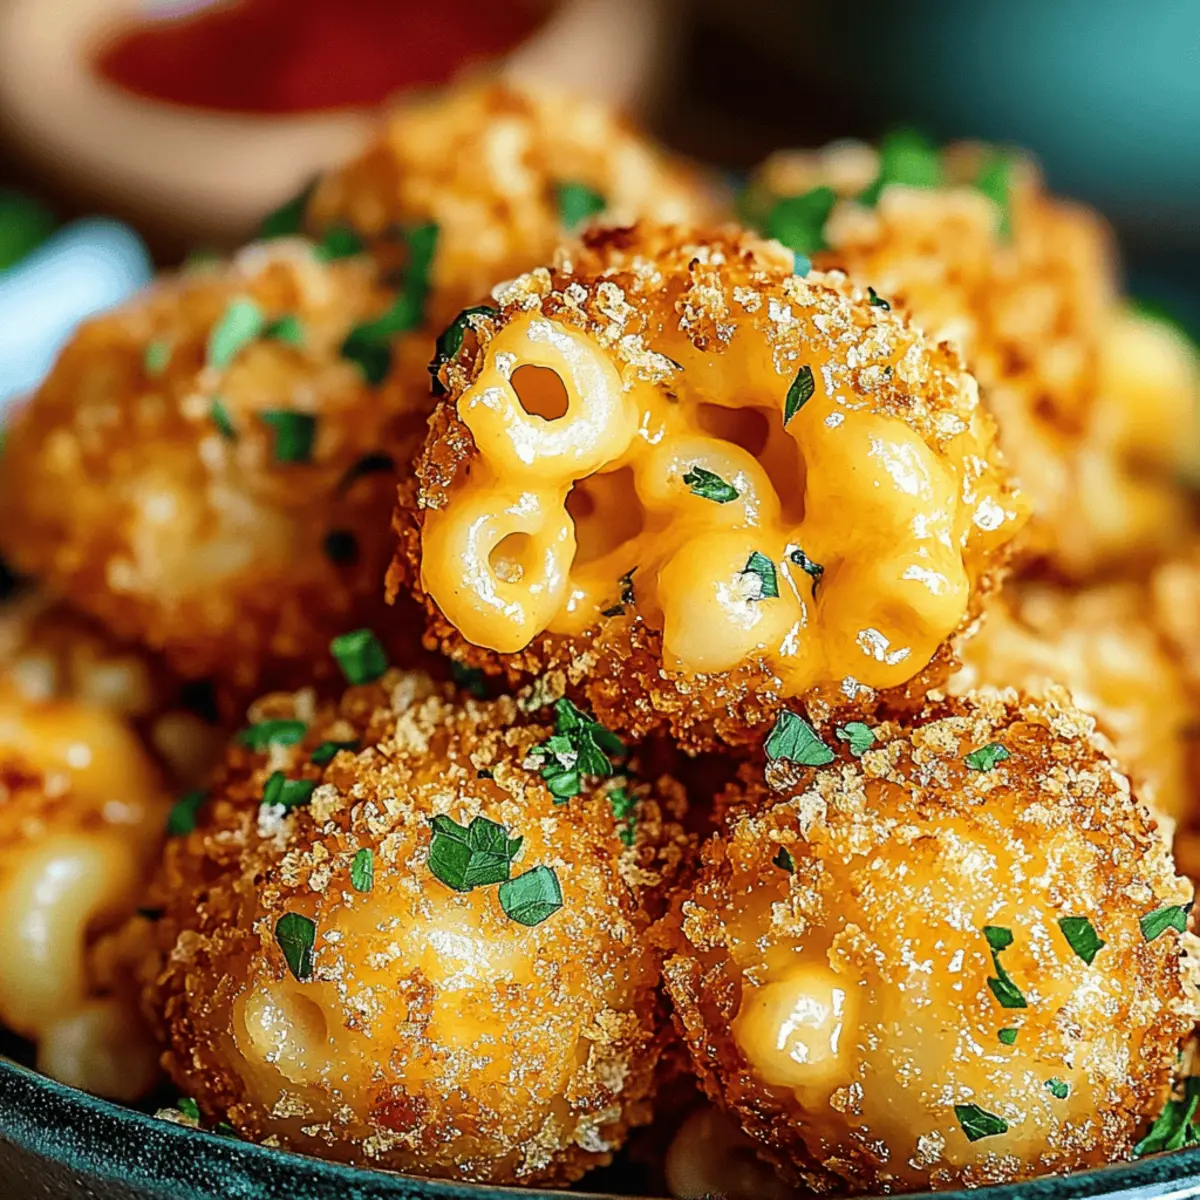
As the aroma of melted cheese fills the kitchen, I can't help but feel a surge of excitement. That's how these Crispy Cheesy Mac and Cheese Bites came to life—transforming classic comfort food into a fun, shareable snack. Perfectly crispy on the outside with a gooey cheesy center, they’re not just a delicious treat but also an easy way to repurpose leftover mac and cheese into something truly special. Ideal for gatherings or an impromptu movie night, these bites are a crowd-pleaser that even the pickiest eaters will adore. Plus, you can customize them to match your cravings or dietary needs. Ready to dive into a world of cheesy goodness? Let’s make some magic happen!

Why are these bites a must-try?
Crispy outside, creamy inside: Each bite delivers the perfect contrast of textures, satisfying both taste and crunch.
Effortless transformation: Turn leftover mac and cheese into an impressive snack in just a few steps!
Crowd pleaser: Perfect for parties, game nights, or casual meals—everyone loves them.
Customizable options: Add your favorite ingredients like jalapeños or spinach for a personal twist.
Quick to make: Fry within minutes for a speedy treat that won’t keep you in the kitchen for long.
Deliciously versatile: Enjoy them alone or pair with your favorite dipping sauces for extra flavor. These bites are just as delightful as classic mac and cheese itself!
Crispy Cheesy Mac and Cheese Bites Ingredients
For the Mac and Cheese
• Elbow Macaroni – The base of this dish; feel free to swap with any short pasta for variety.
• Butter – Vital for the roux; can be substituted with margarine for a dairy-free version.
• All-Purpose Flour – Thickens the cheese sauce; gluten-free flour works well for gluten-sensitive diets.
• Milk – Adds creaminess; substitute with non-dairy milk for lactose-free options.
• Salt – Enhances the overall flavor; adjust according to your taste preference.
• Black Pepper – Freshly ground gives the best flavor; use to season to your liking.
• Nutmeg – Introduces warmth; optional but adds a lovely depth of flavor to the cheese sauce.
• Shredded Cheddar Cheese – Provides a rich, classic flavor; aged cheddar offers a sharper taste.
• Shredded Gruyere Cheese – Adds creaminess; can be replaced with more cheddar if needed.
For the Coating
• All-Purpose Flour (Coating) – For dredging; same as the base flour.
• Eggs – Acts as a binder; consider using flax eggs for a vegan alternative.
• Panko Breadcrumbs – Creates that crispy texture everyone loves; regular breadcrumbs can be used, but panko offers a lighter crunch.
• Garlic Powder – Adds a delicious flavor boost; fresh garlic can be substituted for a more robust taste.
• Paprika – Provides a mild flavor and beautiful color; swap for smoked paprika for a touch of smokiness.
• Cayenne Pepper (Optional) – For those who love a hint of heat; omit if you prefer a milder snack.
For Frying
• Vegetable Oil – Essential for frying; any neutral oil will work well to create that perfect crispy exterior.
These irresistible Crispy Cheesy Mac and Cheese Bites are not just delightful snacks; they're a fun way to reimagine a classic dish! Ready to make your culinary dreams come true? Let’s get cooking!
Step‑by‑Step Instructions for Crispy Cheesy Mac and Cheese Bites
Step 1: Cook the Macaroni
Begin by bringing a large pot of salted water to a boil. Add 2 cups of elbow macaroni and cook until al dente, about 7-8 minutes. Drain the pasta thoroughly and set it aside in a large mixing bowl while you prepare the cheese sauce, ensuring the macaroni doesn’t stick together.
Step 2: Make the Roux
In a medium saucepan, melt 4 tablespoons of butter over medium heat. Once melted, whisk in 4 tablespoons of all-purpose flour, stirring continuously for 1-2 minutes until the mixture turns golden and fragrant—this is your roux! It's crucial to cook the flour slightly to eliminate any raw flavor before adding the milk.
Step 3: Add the Milk
Gradually whisk in 2 cups of milk, ensuring there are no lumps. Continue stirring for about 5-7 minutes until the mixture thickens and coats the back of a spoon. You'll know it's ready when it’s smooth and creamy. This special cheese sauce will be the heart of your Crispy Cheesy Mac and Cheese Bites.
Step 4: Season the Sauce
Once thickened, lower the heat and season the sauce with 1 teaspoon of salt, ¼ teaspoon of black pepper, and a pinch of nutmeg. Stir well to combine, enhancing the flavors just before adding in the cheese. The aroma will be inviting as you prepare to transform this sauce into a cheesy delight.
Step 5: Add the Cheese
Reduce the heat further to low, then stir in 1 cup of shredded cheddar cheese and 1 cup of shredded Gruyere cheese until melted and smooth. Reserve an additional cup of cheddar for later. This creamy mixture is what makes your Crispy Cheesy Mac and Cheese Bites so indulgent.
Step 6: Combine Macaroni and Cheese Sauce
Fold the cooked macaroni into the cheese sauce, mixing until every noodle is adequately coated. This rich combination will form the base of your bites. Remember, the more you mix, the creamier your filling will be!
Step 7: Add Remaining Cheese
Stir in the reserved cup of cheddar cheese, ensuring it evenly distributes throughout the macaroni mixture. This final touch will give your bites an extra cheesy kick when they are fried, making them even more irresistible.
Step 8: Cool the Mac and Cheese
Spread the cheesy macaroni mixture into a greased 9x13-inch baking dish, creating an even layer. Cover and refrigerate for at least 2-3 hours or until firm. Cooling helps give structure to your bites, allowing them to hold together perfectly when fried.
Step 9: Set up Breading Station
Prepare your breading station by placing 1 cup of all-purpose flour in one dish, whisking 2 eggs in another, and mixing 1 cup of panko breadcrumbs with 1 teaspoon of garlic powder and ½ teaspoon of paprika in a third dish. This setup will facilitate a smooth and efficient coating process.
Step 10: Cut the Mac and Cheese
Once cool, remove the mac and cheese from the refrigerator. Using a sharp knife, cut the mac and cheese into bite-sized squares or rectangles. This step is essential for creating uniform bites that fry evenly, enhancing the overall texture of your Crispy Cheesy Mac and Cheese Bites.
Step 11: Coat the Bites
Dredge each square first in the flour, ensuring it is fully coated. Then dip it in the egg mixture, shaking off any excess, and finally coat it with the seasoned panko, pressing gently to adhere. This triple-dip will create that perfect crispy exterior when fried.
Step 12: Heat the Oil
In a deep pot, heat about 3 inches of vegetable oil to 350°F (175°C). It’s best to use a thermometer to ensure the oil is hot enough; this will prevent greasy bites. A properly heated oil guarantees a crispy outside while keeping the cheesy interior gooey.
Step 13: Fry the Bites
Carefully lower the coated mac and cheese bites into the hot oil in batches. Fry for about 2-3 minutes on each side until they are golden brown and crispy. Use a slotted spoon to turn them gently, ensuring even cooking. These bites are best when freshly fried for that perfect crunch!
Step 14: Drain and Serve
Once golden, transfer the fried mac and cheese bites onto a plate lined with paper towels to drain excess oil. Serve immediately alongside your favorite dipping sauces, like marinara or ranch, for a delicious appetizer everyone will love. Enjoy the melted cheesy goodness of your Crispy Cheesy Mac and Cheese Bites!
What to Serve with Crispy Cheesy Mac and Cheese Bites
Pair your delicious bites with mouthwatering sides that elevate your meal and complement those gooey, cheesy flavors perfectly.
-
Creamy Coleslaw: A refreshing, crunchy side that balances the richness of the bites; its tangy dressing adds a delightful contrast.
-
Garlic Bread: Toasted to golden perfection, it adds a satisfying crunch and a warm, buttery flavor—great for scooping up any leftover cheese!
-
Spicy Jalapeño Poppers: For those who love heat, these poppers bring an extra kick, enhancing the overall flavor experience of your snack spread.
-
Vegetable Platter with Hummus: A colorful mix of fresh veggies alongside smooth, creamy hummus offers a light and healthful addition to your meal.
-
Caesar Salad: Crisp romaine paired with a zesty dressing and crunchy croutons provides a classic flavor that contrasts beautifully with the macaroni bites.
-
Homemade Marinara Sauce: Serve with a savory marinara dip for a classic pairing that enhances the cheesy goodness of your bites while providing a comfortingy warmth.
-
Craft Beer: A light lager or hoppy IPA beautifully complements the crunchy outside and cheesy inside of these bites, making it a perfect beverage pairing.
-
Chocolate Chip Cookies: End your gathering on a sweet note with these classic cookies that offer a warm, comforting balance to your savory snack.
Make Ahead Options
These Crispy Cheesy Mac and Cheese Bites are perfect for busy weeknights and meal prep enthusiasts! You can prepare the mac and cheese mixture up to 24 hours in advance and store it in an airtight container in the refrigerator. To maintain the quality, ensure that the mixture cools completely before covering to prevent condensation. When you’re ready to enjoy your bites, simply cut the chilled mac and cheese into squares, coat them, and fry as directed. This way, you can serve delicious, crispy bites with minimal effort, making them an ideal choice for last-minute gatherings or weekday snacks!
How to Store and Freeze Crispy Cheesy Mac and Cheese Bites
Fridge: Store leftover bites in an airtight container for up to 3 days. Reheat in the oven for optimal crispiness, avoiding the microwave which can make them soggy.
Freezer: Freeze uncooked coated bites in a single layer on a baking sheet, then transfer to a freezer bag for up to 2 months. Fry straight from frozen for a quick snack!
Reheating: To reheat cooked bites, place them on a baking sheet and warm at 350°F (175°C) for 10-15 minutes until heated through and crispy.
Make-Ahead: Prepare your Crispy Cheesy Mac and Cheese Bites a day in advance and store in the fridge until ready to fry. This way, you can enjoy fresh bites with minimal prep!
Crispy Cheesy Mac and Cheese Bites Variations
Feel free to take these bites to new heights with your creative flair and tasty swaps!
- Spicy Kick: Add chopped jalapeños or diced green chilies to the mac and cheese for a delightful heat. It gives each bite an exciting twist that warms the heart—and the palate.
- Smoky Flavor: Incorporate crumbled bacon or smoked cheese to give your bites a rich, smoky undertone. This variation adds depth that is simply irresistible.
- Veggie Boost: Toss in finely chopped spinach or broccoli for a nutritious twist. It's a clever way to sneak extra greens into your snacks that even the kids will enjoy!
- Cheese Overload: Mix different types of cheese like pepper jack or feta for an exciting flavor profile. The more cheese, the merrier, right? You can never go wrong with extra cheesiness!
- Gluten-Free Goodness: Use gluten-free flour and breadcrumbs to make this recipe accessible for everyone. A simple swap can open the door to delicious bites for your gluten-sensitive friends.
- Herb Infusion: Sprinkle in fresh herbs like chives or parsley before frying for a burst of flavor. This aromatic addition elevates your bites with a fresh and vibrant note.
- Dipping Sauces: Create personalized dipping sauces like a spicy ranch or tangy barbecue. These sauces can dramatically enhance the overall experience of your bites, turning them into a gourmet exploration of flavors.
- Baked Option: For a healthier alternative, try baking instead of frying. Pop these bites on a greased baking sheet at 400°F (200°C) for about 15-20 minutes or until golden. They may be slightly less crispy but are definitely worth the attempt!
These delightful variations can transform your Crispy Cheesy Mac and Cheese Bites into a whole new culinary experience, ensuring there's something for everyone at the table. Want more inspiration? Check out our other crowd-pleasing recipes for more ideas!
Expert Tips for Crispy Cheesy Mac and Cheese Bites
- Quality Cheese Matters: Use high-quality cheeses like aged cheddar and Gruyere for a richer flavor that elevates your bites immensely.
- Temperature Check: Keep an eye on your oil temperature; too low will lead to greasy bites, while too high can burn them. A thermometer is your best friend here!
- Cool Properly: Ensure the mac and cheese is thoroughly cooled before cutting. This helps the bites hold their shape while frying.
- Customize Ingredients: Feel free to experiment with different cheeses or extras like jalapeños or spinach to suit your taste; it's all about personalized flavor!
- Batch Fry: Don’t crowd the pot when frying to maintain the right temperature, ensuring each Crispy Cheesy Mac and Cheese Bite gets evenly golden and crispy.
Crispy Cheesy Mac and Cheese Bites Recipe FAQs
How do I choose the right macaroni for this recipe?
Absolutely! Elbow macaroni is the traditional choice, providing that ideal base for mac and cheese bites. However, feel free to swap it out for any short pasta shape you enjoy, like shells or cavatappi. Just ensure you cook it until al dente for the best texture when frying!
How should I store leftover mac and cheese bites?
Store any leftovers in an airtight container in the refrigerator for up to 3 days. To reheat, pop them on a baking sheet in a preheated oven at 350°F (175°C) for about 10-15 minutes until they're hot and crispy again. Avoid the microwave, as it can make them soggy!
Can I freeze mac and cheese bites?
Of course! To freeze uncooked bites, arrange them in a single layer on a baking sheet until firm, then transfer them to a freezer bag. They can be stored in the freezer for up to 2 months. When ready to cook, you can fry them straight from the freezer—no thawing needed!
What should I do if my bites don't hold together when frying?
If your mac and cheese bites fall apart, it might be due to not cooling them long enough. Make sure you chill them for at least 2-3 hours, as this helps them firm up. Additionally, ensure that you're using a proper breading technique—dredging in flour, dipping in egg, and then coating in panko will help bind everything together beautifully!
Are these bites suitable for people with dietary restrictions?
Certainly! You can easily customize these bites for various dietary needs. Use gluten-free flour and panko for those avoiding gluten. For a dairy-free option, substitute the milk with non-dairy milk and use vegan cheese. Also, if you're prepping for vegans, consider replacing the eggs with flax eggs—simply mix 1 tablespoon of ground flaxseed with 3 tablespoons of water, let it sit until it thickens, and voila!
How long can I keep cooked mac and cheese bites in the fridge?
Cooked mac and cheese bites can be stored in the fridge for up to 3 days. It's best to keep them in an airtight container. When reheating, use the oven for a few minutes to keep the bites crispy and delicious!

Irresistibly Crispy Cheesy Mac and Cheese Bites You’ll Love
Ingredients
Equipment
Method
- Begin by bringing a large pot of salted water to a boil. Add the macaroni and cook until al dente, about 7-8 minutes. Drain and set aside.
- In a medium saucepan, melt the butter over medium heat. Whisk in the flour, stirring continuously for 1-2 minutes until golden and fragrant.
- Gradually whisk in the milk, stirring for 5-7 minutes until thickened and smooth.
- Lower the heat and season with salt, black pepper, and nutmeg. Stir to combine.
- Reduce heat to low, stir in cheddar and Gruyere cheeses until melted and smooth. Reserve some cheddar for later.
- Fold the cooked macaroni into the cheese sauce until well combined.
- Stir in the reserved cheddar cheese evenly.
- Spread the mixture into a greased dish and refrigerate for 2-3 hours until firm.
- Prepare the breading station: place flour in one dish, whisk eggs in another, and mix breadcrumbs, garlic powder, and paprika in a third.
- Cut the mac and cheese into bite-sized squares or rectangles.
- Dredge each square in flour, dip in egg, and coat with panko breadcrumbs.
- Heat vegetable oil in a deep pot to 350°F (175°C).
- Fry the bites in batches for 2-3 minutes on each side until golden brown and crispy.
- Transfer fried bites onto paper towels to drain excess oil and serve with dipping sauces.


Leave a Reply